Previously, I wrote about why Git-based repositories have become popular and why TFS users ought to migrate to Git.
In this article, I would like to take a stab at providing a quick guide for longtime TFS / Visual Studio users to quickly ramp up on the knowledge required to work on Git-based repositories. This article will try to present Git usage based on the perspective of a TFS user. Of course, there may be some Git-only concepts, but I will try my best to lower the learning curve for the reader.
I do not intend to thoroughly explore the basic Git concepts. There are very good tutorials out there with amazing visualizations (e.g. see Git tutorial). However, this is more like a no-frills quick guide for no-messing-around people to quickly get something done in a Git-based world (Am I hitting a nerve yet? :P).
Visual Studio has done a good job abstracting the complex commands behind the scenes, though I would highly recommend going through the nitty-gritty details of each Git command if you are vested in using Git for the long term.
For this tutorial, I only require that you have one of the following installed:
- Visual Studio 2013
- Visual Studio 2012 with Visual Studio Tools for Git
Remapping your TFS-trained brain to a Git-based one
Let’s compare the different approaches between TFS and Git.
TFS Terminology
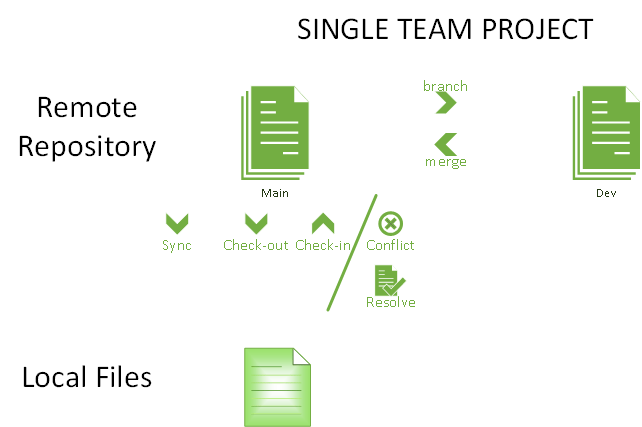
- You will start your work on a TFS solution by synchronizing the repository to your local folder.
- Every time you modify a file, you will check out that file.
- Checking-in a file commits the change to the central repository; hence, it requires all contributors who are working on that file to ensure that conflicts have been resolved.
- The one thing to note is that TFS keeps track of the entire content of files, rather than the changes made to the contents.
- Additionally, versioning and branching requires developers to obtain special rights to the TFS project repository.
Git Terminology
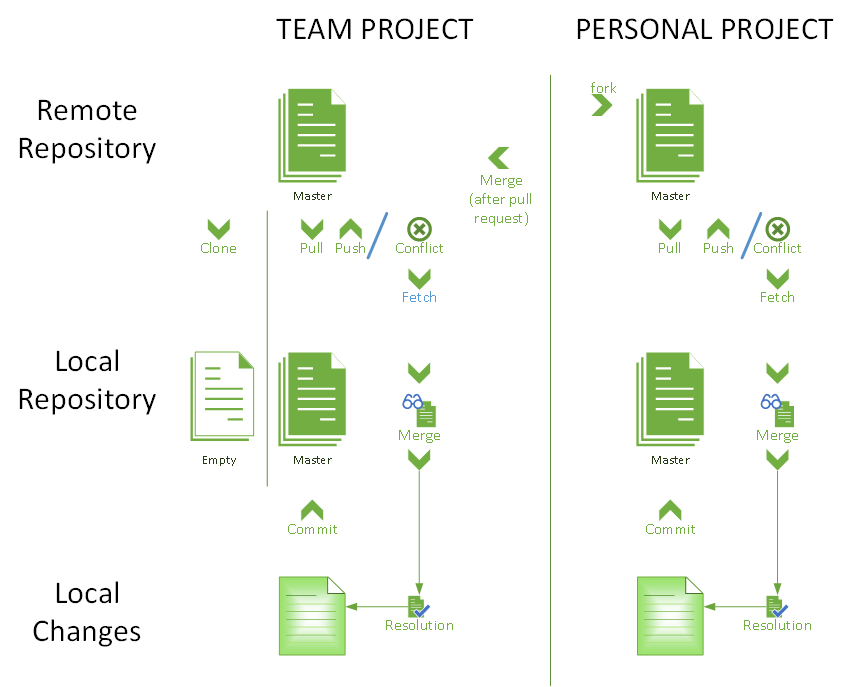
If you are part of the core contributor group (left part of diagram):
- Git, on the other hand, introduces the concept of a local repository. Each local repository represents a standalone repository that allows the contributor to continue working, even when there is no network connection.
- The contributor is able to commit work to the local repository and create branches based on the last snapshot taken from the remote repository.
- When the contributor is ready to push the changes to the main repository, a sync is performed (pull, followed by a push). If conflicts do occur, a fetch and a merge are performed which requires the contributor to resolve conflicts.
- Following conflict resolution, a commit is performed against the local repository and then finally a sync back to the remote repository.
- The image above excludes the branching concept. You can read more about it here.
If you are an interested third party who wants to contribute (right part of diagram):
- The selling point of Git is the ability for external users (who have read-only access) to contribute (with control from registered contributors).
- Anyone who has read-only access is able to set up a Personal Project within the Git service and fork the repository.
- Within this project, the external contributor has full access to modify any files. This Personal Project also has a remote repository and local repository component. Once ready, the helpful contributor may launch a pull request against the contributors of the main Team Project (see above).
- With Git, unregistered contributors are able to get involved and contribute to the main Team Project without risking breaking the main project.
- There can be as many personal projects forking from any repositories as needed.
- *It should be noted that any projects (be it Personal or Team Projects) can step up to be the main working project in the event that the other projects disappear/lose popularity. Welcome to the wild world of open source development.
Guide to Your Very First Git Project
Outlined below are the steps you will take to make your very first check-in to a Git repository. This walkthrough assumes you are new to Git but have been using Visual Studio + TFS for a period of time.
Start from the very top and make your way to the bottom by trying out different approaches based on your situation and scenario. These approaches are the fork and pull (blue) and the shared repository (green) models. I intentionally present the feature branching model (yellow) (which I am not elaborating in this article) to show the similarities. You can read about these collaborative development models here.
Feel free to click on any particular step to learn more about it in detail.

Migrating from TFS to Git-based Repository
- Create a new folder for your repository. TFS and Git temp files do not play nicely with each other. The following would initialize the folder with the relevant files for Visual Studio projects and solutions (namely .ignore and .attribute files).

- Copy your TFS project over to this folder.
- I would advise running the following command to remove “READ ONLY” flags for all files in the folder (this is automatically set by TFS when files are not checked out).
>attrib -R /S /D * - Click on Changes.
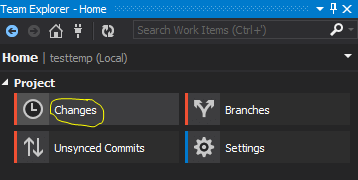
- You will notice the generate files (.gitattributes & .gitignore). For now, you want to add all the files that you have just added. Click Add All under the Untracked Files drop down menu.
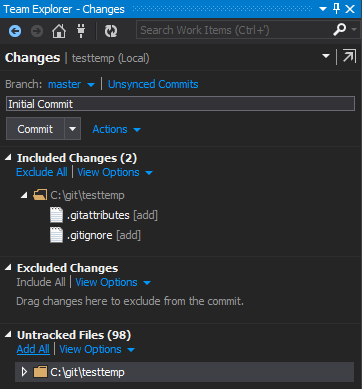
- Then, click the Unsynced Commits.
- Enter the URL of the newly created remote repository. This URL is obtained from the Git service when creating a new project repository.

- You will be greeted with the following prompt:
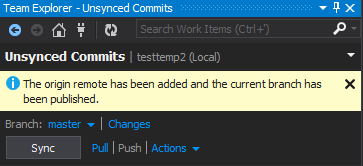
- You will then see Visual Studio solution files listed in the view. If you do not have solution files, then unfortunately, you will have to rely on tools such as the Git command line or other visualization tools.
Clone Repository onto Your Local Machine
- Within Visual Studio, in the Team Explorer bar,
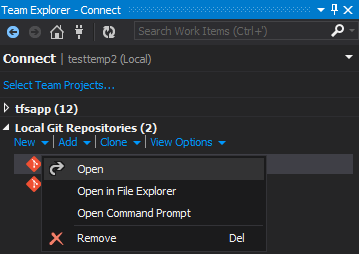
- Click the Connect to Team Projects.
- Clone a repository by entering the URL of the remote repository.
- Provide a path for your local repository files.
- You will then see Visual Studio solution files listed in the view. If you do not have solution files, then unfortunately, you will have to rely on tools such as the Git command line or other visualization tools.
Commit the Changes
- All basic operations (Create, Remove, Update, Delete, Rename, Move, Undelete, Undo, View History) are identical to the ones used with TFS.
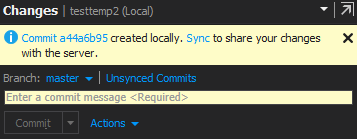
- Please note that committing the changes DOES NOT affect the remote repository. This only saves the changes to your local repository.
- After committing, you will see the following notification:
Pushing to the Remote Repository
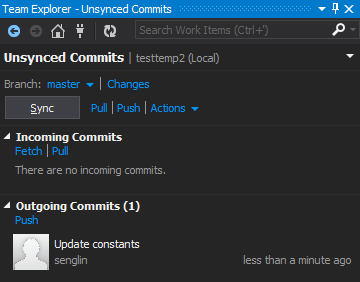
- Committing does not store the changes to the remote repository. You will need to push the change.
- Sync refers to the sequential steps of pulling (to ensure both local and remote repositories have the same base changes) and pushing from/to the remote repository.
Pulling from the Remote Repository and Conflict Resolution
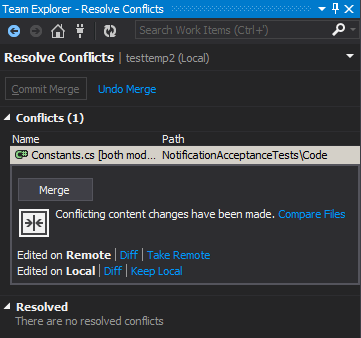
- If no other contributors have added a change that conflicts with your change, you are good to go. Otherwise, the following message will appear:

- Click on Resolve the Conflict link to bring up the Resolve Conflict page. This is similar to conflict resolution in TFS. Click on Merge to bring up the Merge Window.
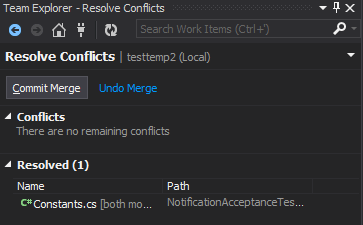
- Once you are done merging, hit the Accept Merge button.

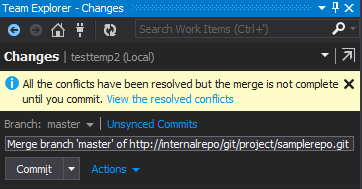
- Merging creates new changes on top of your existing changes to match the base change in the remote repository. Click Commit Merge, followed by Commit in order to commit this change to your local repository.
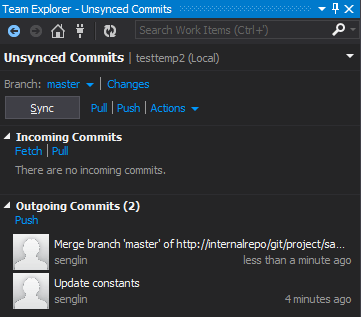
- Now, you can finally click Sync.
- If you see the following message, you have completed the “check-in” to your remote repository.
Forking a Repository
- Forking is needed when developers have restricted (read-only) access to a repository. See Workflow Strategies in Stash for more information.
- One thing to note is that forking is essentially server-side cloning. You can fork any repository provided you have read access. This allows anyone to contribute and share changes with the community.
- There are two ways to ensure your fork stays current within the remote repository:
- Git services such as Stash have features that automatically sync the forked repository with the original repository.
- Manually syncing with the remote server
- You are probably wondering what the difference is between branching and forking. Here is a good answer to that question. One simple answer is that you have to be a registered collaborator in order to make a branch or pull/push an existing branch.
- Each Git service has its own way of creating a fork. The feature will be available when you have selected the right repository project and a branch to fork. Here are the references for GitHub and Stash respectively.
- Once you have forked a repository, you will have your own personal URL for the newly created/cloned repository.
Submit a Pull Request
- Pull requests are useful to notify project maintainers about changes in your fork, which you want integrated into the main branch.
- A pull request initiates the process to merge each change from the contributors’ branch to the main branch after approval.
- Depending on the Git service, a pull request provides a means to conduct code reviews amongst stakeholders.
- Most Git services will be able to trigger a pull request within the branch view of the repository. Please read these sites for specific instructions for BitBucket, GitHub and Stash.
- A pull request can only be approved if there are no conflicts with the targeted branch. Otherwise, the repository will provide specific instructions to merge changes from the main repository back to your working repository.
Summary
Git is a newer approach to version control and has been very successful with open source projects as well as with development teams who adopt the open source methodology. There are benefits for both Git and TFS repositories. Some projects may not be suitable candidates for adopting Git, whereas some are appropriate. These factors include team size, team dynamics, project cadence and requirements.
What are your thoughts about when Git should be the preferred version control for a project? What is the best approach for lowering the learning curve for long-term TFS users? How was your (or your team’s) experience in migrating towards full Git adoption? Did it work out? What Git tools do you use to improve Git-related tasks? Please share your experience in the comment section below.